
Writing a heartfelt message on a birthday cake sounds simple — until you squeeze that piping bag and your letters come out wobbly, smeared, or completely illegible. Sound familiar? Learning how to write on a cake with icing is one of the most-asked skills in home baking, and the good news is: it’s 100% learnable, even if you’ve never decorated a cake before. In this guide, you’ll get every tool, technique, and pro trick you need to pipe clean, beautiful lettering on your very first try.
Quick Answer: To write on a cake with icing, fill a piping bag fitted with a small round tip (like Wilton #2 or #3) with stiff buttercream or royal icing. Practice your message on parchment paper first, then pipe slowly and steadily onto the chilled cake surface. Keep your hand relaxed, your pressure consistent, and let gravity help you drag the icing smoothly.
What You Need to Write on a Cake with Icing

Before you touch that piping bag, having the right tools makes all the difference. Most beginners struggle not because of skill, but because they’re using the wrong equipment.
Piping Bags
A disposable piping bag is your best friend here. Reusable silicone bags work too, but disposable ones give you more control and are easier to handle when filled with stiff icing. Fill the bag no more than halfway — an overfilled bag is hard to grip and messy to use.
Piping Tips for Writing
Use a small round piping tip for lettering. The most popular choices are:
- Wilton #1 or #2 — ultra-fine lines, great for elegant script
- Wilton #3 or #4 — slightly thicker, easier for beginners
- PME #1 or #1.5 — smooth, consistent flow for detailed work
Avoid star tips or large round tips for writing — they create thick, blobby letters that are hard to control.
Not sure which tip number does what? Wilton’s complete round piping tips guide breaks down every size with real examples — it’s the most trusted reference in cake decorating.
The Best Icing for Writing on Cakes

Not all icing is created equal when it comes to writing. Here’s what works best:
- Buttercream (stiff consistency): The most beginner-friendly option. Add a little extra powdered sugar to your regular buttercream until it holds its shape without drooping. Soft buttercream will spread and blur your letters.
- Royal icing: Dries hard and creates crisp, clean lines. Ideal for a polished, professional look. It’s less forgiving once it sets, so work quickly.
- Gel icing pens: A fantastic cheat for total beginners. These pre-filled pens from the baking aisle let you write directly on the cake like a marker. They’re perfect for simple inscriptions on smooth fondant or ganache.
According to professional cake decorators, royal icing is the go-to choice for competition-level writing because of its precise consistency and clean finish. For home bakers, stiff buttercream offers the same results with a little more margin for error.
Once you’ve mastered writing on a cake, you’ll be ready to tackle some truly stunning designs — check out these beautiful birthday cake ideas for mom for your next celebration.
How to Write on a Cake with Icing: Step-by-Step
Step 1: Chill Your Cake First
A cold cake is a stable cake. Place your frosted cake in the fridge for at least 30 minutes before writing on it. A firm, chilled surface holds the icing letters without them sinking or spreading. This single step eliminates one of the most common beginner mistakes.
Pro tip: If your cake is freshly frosted and still soft, even perfect piping will look messy. Always chill first.
Step 2: Plan and Practice Your Message

Before you pipe anything on the actual cake, write your message on a sheet of parchment paper placed over a printed font guide. This lets you practice the exact pressure and spacing you’ll need. Repeat the message three to five times until it feels natural in your hand.
Common mistake: Skipping practice and going straight to the cake. Even experienced decorators warm up on parchment first.
Step 3: Mark Your Spacing on the Cake
Use a toothpick to lightly score the starting position of each letter directly on the frosting — these tiny marks are invisible once you pipe over them. This prevents the classic problem of running out of space halfway through your message.
For a centered inscription, measure the cake’s surface width and divide by the number of characters (including spaces) to find even spacing. It sounds technical, but it takes less than a minute and makes a huge visual difference.
Step 4: Load and Test Your Piping Bag
Fit your piping bag with the chosen tip, spoon in your stiff icing, and twist the top closed. Before you touch the cake, pipe a few test letters on parchment. You’re checking two things:
- The icing flows smoothly without air bubbles
- The pressure feels comfortable and consistent
If you feel resistance, the icing may be too thick — add a tiny drop of water and mix again.
Step 5: Pipe Your Letters onto the Cake

Hold the bag at a 45-degree angle to the cake surface. Touch the tip lightly to the surface, apply gentle pressure, and drag the icing rather than pushing it. Dragging creates smooth, connected lines. Pushing creates blobs and uneven strokes.
Keep your wrist relaxed and your elbow guiding the movement — not your fingers. Write at a steady, unhurried pace. Speed is the enemy of neat lettering.
Pro tip: For cursive or script lettering, connect each letter in a single continuous motion when possible. Lifting and re-touching the bag creates visible start points that break the flow.
Step 6: Fix Mistakes Immediately
Made a wobbly letter? Don’t panic. Use a toothpick to gently lift the icing off the cake surface while it’s still wet. Then wipe the area clean with a damp fingertip, let it cool for two minutes, and try again.
For deeper mistakes on buttercream cakes, a small offset spatula can smooth the surface back to a clean slate.
Best Fonts and Styles When You Write on a Cake with Icing
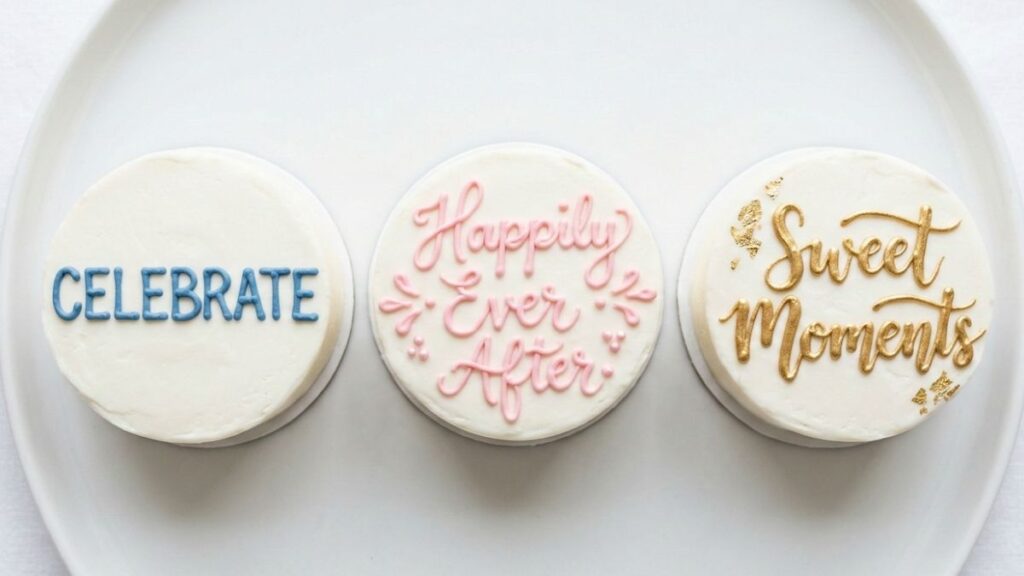
Simple Print Lettering
Straight, block-style capital letters are the easiest to pipe and the most readable. They look clean, modern, and work on any cake style. Great for beginners.
Cursive or Script Lettering
Flowing script looks elegant and “professional” — but it requires more practice. Start with simple connected lowercase letters. Avoid letters with lots of loops (like capital Q or G) until you’re comfortable.
Brush Lettering Style
This trending style mimics calligraphy, with thick downstrokes and thin upstrokes. Achieved by varying your pressure on the piping bag. It’s stunning on celebration cakes and looks impressive even when slightly imperfect.
People Also Ask
Stiff buttercream is the easiest icing for beginners because it’s forgiving and easy to fix. Simply add extra powdered sugar to thicken it until it holds its shape. Royal icing gives cleaner results but sets hard quickly, leaving less room for correction.
Always chill your cake before writing on it. A firm, cold surface prevents the icing from sinking into the frosting. Use stiff-consistency icing (not soft or fluffy), and avoid touching the letters once piped until they firm up — usually 10–15 minutes at room temperature.
Yes! Snip a tiny corner off a ziplock bag, fill it with icing, and use it exactly like a piping bag. It won’t give you as much control as a bag with a proper piping tip, but it works great for casual writing in a pinch.
A Wilton #2 or #3 round tip is the most popular choice for cake writing. The #2 gives thinner, more elegant lines; the #3 is slightly thicker and easier to control for beginners. Avoid going larger than #4 for lettering — the letters become heavy and harder to shape.
Use a toothpick to lightly mark the center of the cake surface, then plan your message outward from the middle. Alternatively, write on a piece of parchment the same size as the cake top, check that it fits well, then use the parchment as a guide while piping.
You can, but store-bought frosting is usually too soft for clean piping. Stiffen it by mixing in extra powdered sugar (about ¼ cup at a time) until it holds its shape. Or use a ready-made icing pen from the baking aisle for the simplest option of all.
Need inspiration for what to write? Browse these creative 25th birthday cake ideas for milestone celebration messages and design themes that pair beautifully with custom lettering.
Expert Tips for How to Write on a Cake with Icing Neatly

Warm Up Your Hands Before Piping
Cold, stiff hands create shaky lines. Rub your hands together for 30 seconds before picking up the bag. Warm hands give you better control over pressure and movement.
Use Gel Food Coloring for Vibrant Icing
Liquid food coloring thins out icing, which ruins your consistency. Always use gel food coloring — a tiny amount creates vivid, bold color without changing the icing texture.
Write Smaller Than You Think
Most beginners write too large and run out of space. On a standard 8-inch round cake, aim for lettering about ½ inch tall. Practice at that scale on parchment before moving to the cake.
Print a Font Guide
Download a free calligraphy or lettering worksheet from Pinterest or a font website, slip it under your parchment paper, and trace the letters while practicing. This builds muscle memory fast and helps you develop a consistent style.
Let the Bag Do the Work
Don’t grip the piping bag too tight — tension travels down into your strokes. Hold the bag the way you’d hold a pen: firmly enough for control, loosely enough for flow. Most people white-knuckle the bag at first. Consciously loosen your grip every 30 seconds.
Contrast Is Everything
Dark icing on a light frosting, or white icing on chocolate ganache — strong color contrast makes lettering pop and look intentional. Avoid similar-toned combinations (like ivory writing on vanilla buttercream) unless you add a thin outline.
If you’re decorating a themed celebration cake, lettering becomes even more magical — take a look at these Disney princess castle cake ideas for font and color inspiration that kids absolutely love.
Conclusion

Writing on a cake doesn’t require years of baking school or an artistic background — it just takes the right tools, a little practice on parchment paper, and the confidence to try. Now that you know exactly how to write on a cake with icing, from choosing the best icing consistency to piping your first letter, there’s nothing stopping you from creating a birthday cake that feels truly personal and special. Save this guide, share it with a fellow home baker, and let us know in the comments how your first cake inscription turned out — we’d love to see it!